|
Main Menu > Contact Relationship Manager |


The Customers (F6) tab of the Contact Relationship Manager is where everything crucial to developing, improving, and retaining your customer relationships are stored.

Contact Relationship Manager Contacts Tab Screen
|
Customer - The customers code. Clicking F3 will select the Cust Code field allowing users to enter a different customer code. Name/Address - Displays the name and address of the selected customer. The address displayed here can originate from one of two places - 1.Customer Location Address (from CRM) = the address is coming from the Contact Details Maintenance information screen in the CRM (if it exists) or, if that is blank it will show 2.Customer Billing Address (from Debtors) = the address from Customer Masterfile Maintenance. Account Mgr - Displays the sales rep code and name for the selected customer set up in Customer Masterfile Maintenance. Mkt Code - Displays the market code for the selected customer set up in Customer Masterfile Maintenance. Cust Group - Displays the customer group for the selected customer set up in Customer Masterfile Maintenance. Sales Contact - Displays the sales contact for the selected customer set up in Customer Masterfile Maintenance. Sales Phone - Displays the sales phone number for the selected customer set up in Customer Masterfile Maintenance. Sales Email - Displays the sales email address for the selected customer set up in Customer Masterfile Maintenance. |
|
Clicking the map icon will navigate users to the address on Google Maps. |
|
Navigates users to the CRM - Quick Attach Files screen to attach files to the customer. Please refer to Quick Attach Files to CRM for more information. |
|
Clicking the
|
|
Clicking the email button allows users to send a new blank email or a new email from a CRM template via Outlook to the email address displayed. Please refer to Sending an email via the email button in the CRM for more information. |
|
Global Customer Enquiry (F5) – Navigates users to the Global Customer Enquiry for the selected customer. |
|
Notes/Attachments/Tasks (F9) - Navigates users to CRM - Customer Notes/Attachments/Task screen. Please refer to Notes/Attachments/Tasks for more information. |
|
Jump To (F8) - (The options available in the Jump To button will be determined by users access). 1. Enter Sales Order/Quote - Navigates users to Sales Order/Quote Entry & Maintenance to enter a new sales order or quote. 2. New Service Job - Navigates users to Service Job Entry/Maintenance to enter a new service job. 3. Enter Direct Sales Invoice - Navigates users to Sales Invoice/Credit Entry & Maintenance to enter a new Sales Invoice. 4. Enter Direct Sales Credit - Navigates users to Sales Invoice/Credit Entry & Maintenance to enter a new Sales Credit. 5. Enter NCN/CAR - Navigates users to Non-Conformance/CAR Entry & Maintenance to enter a new NCN/CAR. 6. Customer Maintenance - Navigates users to Customer Masterfile Maintenance to edit the customer. 7. Debtors Posting - Navigates users to Cash Receipts & Debtor Posting to apply credits or post debtor receipts. 8. Enter Debtors Journal - Navigates users to Debtors Journal Entry to enter a debtors journal. A. Customer/Product Details - Navigates users to Customer/Product Information. O. Office Brands Integration - 1. Register Customer on WebX - Allows users to register a customer on WebX. 2. Upload Contract Pricing - Allows users to upload contract pricing for the selected customer to their login on your website. 3. Upload Favourites List - Allows users to upload favourites lists for the selected customer to their login on your website.
|
|
Customer Overview - Displays a list of relevant data that may be of interest to users. Double clicking on an item will navigate users to more detail on the item (eg double clicking Outstanding Sales Orders will navigate users directly to the Outstanding Sales Orders tab of the Global Customer Enquiry. |
|
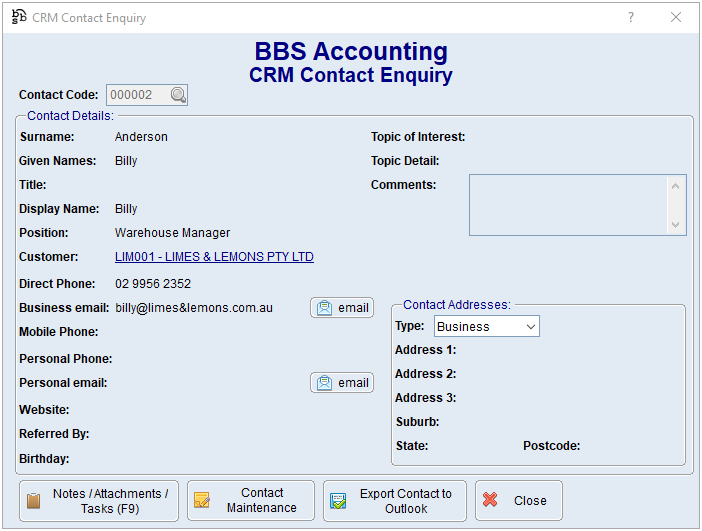
Company/Contacts - Displays a list of contacts for the selected customer. Double clicking a contact allows users to view the selected contact's information.
Clicking the email button will allow users to send an email to the selected contact. Please refer to Sending an email via the email button in the CRM for more information. Clicking the Notes/Attachments/Tasks (F9) button navigates users to CRM Notes/Attachments/Tasks for the selected contact. Clicking the Contact Maintenance button navigates users to CRM Contact Entry/Maintenance for the selected contact. Clicking the Export Contact to Outlook button will open an Outlook Contact window with all of the selected contact's details in BBS pre-filled in Outlook. |
|
Edit - Allows users to edit the details of the selected contact for the selected customer/prospect. Please refer to Contact Details Maintenance for more information. |
|
Custom Fields – Displays the date a custom field was last updated. |
|
Displays the CRM custom fields that have been setup in your system for customers and the selected customer's data. Double clicking a line allows users to edit the customer's data. Please refer to CRM Custom Field Data Maintenance for more information. |


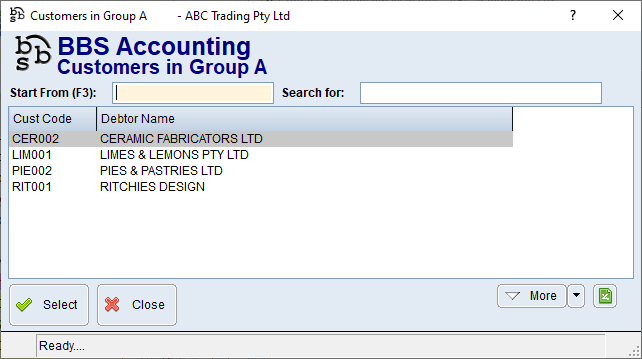
 allows users to view other customers within the same Customer Group.