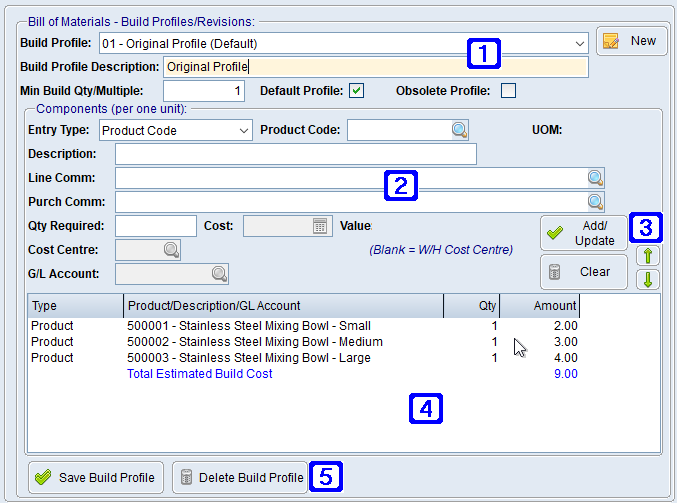
A Bill of Materials Build Profile can be created when users wants to create or build the finished products from other products and include other costs associated with the build. The example shown below is a profile for the build of a 3 pack of Stainless Steel Mixing Bowls from individual bowls that are purchased and sold as individual products, in this situation it was created as the suppliers were out of stock of the 3packs. Builds can be created for any product that is built from other products and can also incorporate labour and other costs.

Product Masterfile Maintenance Bill of Materials/Bundle Components Tab Screen
|
Bill of Materials - Build Profiles/Revisions: •Build Profile - The name of the build profile. Users can select an existing build profile by clicking the drop down arrow or create a new build profile by clicking the New button. •Build Profile Description - The description of the build profile. •Minimum Build Qty/Multiple - The minimum amount of product that the build will create. •Default Profile - When ticked the selected build profile is the default profile for when the product is built if other build profiles exist. The default build profile cost will also be the future cost shown for 'BBSBOM' supplier in the Suppliers & Cost Pricing tab. When creating the build the default build profile will be first offered for selection. •Obsolete Profile - When ticked the build profile will be marked as OBSOLETE. |
|
Components (per one unit) - Contains information for the components used to create the build and is based on components required to build one finished product. •Entry Type - The type of entry that is to be included in the build profile, options are; •Product Code - Allows users to enter product codes for the products required for the selected build profile. •Labour - Allows users to enter labour costs to create the build. •Consumables - Allows users to enter any other items/costs relating to the build such as packaging. •Instruction - Allows users to enter instructions for the build into the description field, the instructions will appear as a line item in the build profile at no cost. •G/L Account - Allows users to enter amounts that have been recorded against a G/L account that would relate to the cost of a build, such as the cost of a sub-contractor that was hired to create the build, power that was paid and used when creating the build etc. •Description - The description to display for the selected Entry Type. •UOM - The Stock UOM is displayed. •Line Comm - Users can enter a line comment about the Entry Type if they wish. Clicking the •Purch Comm - Allows users to enter a purchasing comment if required that will alert the purchasing department that a purchasing comment exists. This can be useful when the selected product is required to be purchased from a specific supplier to be guaranteed a special price etc. Clicking the •Qty Required - The quantity of the selected component required for the build. •Cost Centre - The cost centre the expense will be posted against. •G/L Account - The expense/GL account the expense will be posted to. |
|
Add/Update - Adds the Entry Type to the build profile. Clear - Clears the current line and removes the Entry Type from the build profile. The |
|
Displays a list of components required for the build profile. Double clicking a line will allow users to edit or clear the component. |
|
Save Build Profile - Saves the selected build profile. Delete Build Profile - Deletes the selected build profile. |


 will allow users to add multiple lines.
 buttons can be used to move the selected lines up and down in a build profile.
